iMac: How to remove or install memory
iMac: How to remove or install memory
Learn how to remove or install memory in your iMac computer.
Choose your model
To identify your iMac model, use the information in How to identify iMac models.
*Note: Memory replacement on the iMac (21.5-inch, Late 2012) and iMac (21.5-inch, Late 2013) is not user-removable and must be done by an Apple Retail Store or Apple Authorized Service Provider.
Applicable models
iMac (27-inch, Mid 2012)
iMac (27-inch, Mid 2013)
Memory specifications
These iMac models have these memory specifications:
| Number of memory slots | 4 |
| Base memory | 8 GB |
| Maximum memory | 32 GB Note: Memory replacement on the iMac (21.5-inch, Late 2012) and iMac (21.5-inch, Late 2013) is not user-removable and must be done by an Apple Retail Store or Apple Authorized Service Provider. |
Use Small Outline Dual Inline Memory Modules (SO-DIMM) that meet all of these criteria:
| iMac (Mid 2012) |
| PC3-12800 |
| Unbuffered |
| Nonparity |
| 204-pin |
| 1600MHz DDR3 SDRAM |
Removing or installing memory
Warning: The internal components of your iMac computer can be warm. If you have been using your iMac computer, wait ten minutes after shutting down the computer to let the internal components cool before continuing.
Installation
- Turn off your computer by choosing Shut Down from the Apple () menu.
- Disconnect the power cord and all other cables from your computer.
- Place a soft and clean towel or cloth on the desk or other flat surface to prevent scratching the display.
- Hold the sides of the computer and slowly lay the computer face-down on the towel or cloth.
- Open the memory compartment door by pressing the small grey button located just above the AC power port.
- The memory compartment door will open as the button is pushed in. Remove the compartment door and set it aside.
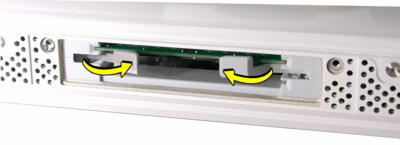
- Locate two levers on the right and left sides of the memory cage. Push the two memory cage levers outward to release the memory cage.
- Once the memory cage is released:, pull the memory cage levers toward you, allowing you to access each individual DIMM slot.
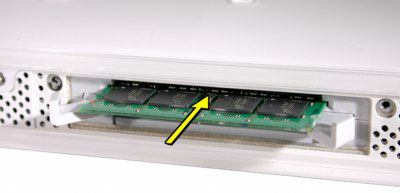
- Remove a DIMM by pulling the module straight up and out.
- Replace or install a DIMM by setting it down into the slot and pressing firmly until you feel the DIMM click into the slot.
Note: The DIMM slot shown below is for the the iMac (27-inch, Mid 2013) which requires you insert the DIMM with the notch on the bottom oriented towards the right. - Once you have all of your DIMMs installed, push the memory cage levers back into the housing until they subtly click back into place.
- Replace the memory compartment door. There is no need to depress the compartment door release button when replacing the compartment door.
- Place the computer in its upright position. Reconnect the power cord and all other cables to the computer, then start up the computer.


Note: There is a diagram on the underside of the compartment door showing the memory cage levers and the orientation of the DIMM.


Additional Information
See Mac computers: About startup tones if you hear tones after installing or replacing memory.
Applicable models
iMac (27-inch, Mid 2011)
iMac (21.5-inch, Mid 2011)
iMac (27-inch, Mid 2010)
iMac (21.5-inch, Mid 2010)
iMac (27-inch, Late 2009)
iMac (21.5-inch, Late 2009)
Memory specifications
These iMac models have these memory specifications:
| Number of memory slots | 4 |
| Base memory | 4 GB (but is configured to order) |
| Maximum memory | 16 GB Note: For the iMac (Late 2009) models, you can use 2 GB or 4 GB RAM SO-DIMMs of 1066 MHz DDR3 SDRAM in each slot. For the iMac (Mid 2010) and iMac (Mid 2011) models, use 2 GB or 4 GB RAM SO-DIMMs of 1333 MHz DDR3 SDRAM in each slot. |
Use Small Outline Dual Inline Memory Modules (SO-DIMM) that meet all of these criteria:
| iMac (Mid 2011) | iMac (Mid 2010) | iMac (Late 2009) |
| PC3-10600 | PC3-10600 | PC3-8500 |
| Unbuffered | Unbuffered | Unbuffered |
| Nonparity | Nonparity | Nonparity |
| 204-pin | 204-pin | 204-pin |
| 1333MHz DDR3 SDRAM | 1333MHz DDR3 SDRAM | 1066MHz DDR3 SDRAM |
Additional notes i5 and i7 Quad Core iMac computers come with both top memory slots populated. These computers will not start up if only a single DIMM is installed in any bottom slot; these computers should operate normally with a single DIMM installed in any top slot. Core Duo iMac computers should operate normally with a single DIMM installed in any slot, top or bottom. ("Top" and "bottom" slots refer to the orientation of the slots in the pictures below. "Top" refers to the slots closest to the display; "bottom" refers to the slots closest to the stand).
Removing or installing memory
Warning: The internal components of your iMac computer can be warm. If you have been using your iMac computer, wait ten minutes after shutting down the computer to let the internal components cool before continuing.
To install memory into the bottom slot, follow these instructions:
- Turn off your computer by choosing the Apple () menu, then Shut Down.
- Disconnect all cables and the power cord from your computer.
- Place a soft, clean towel or cloth on the desk or other flat surface to prevent scratching the LCD display.
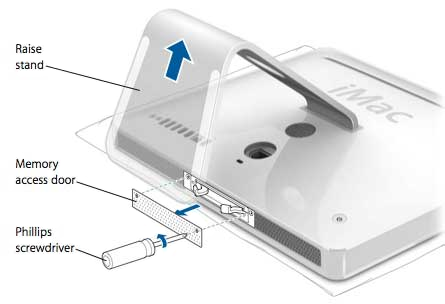
- Hold the sides of the computer and slowly lay the computer face down.
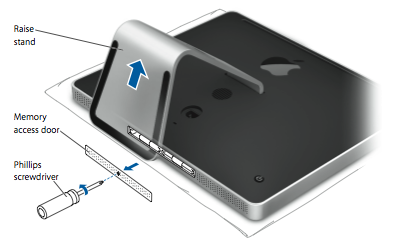
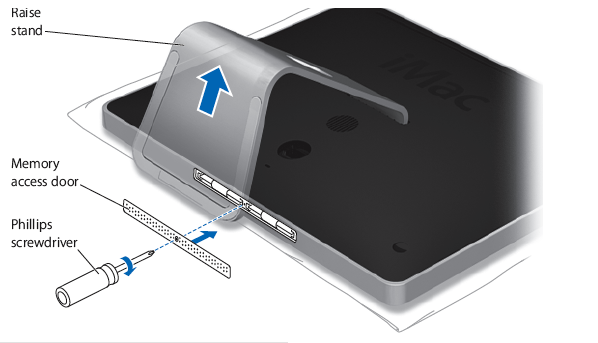
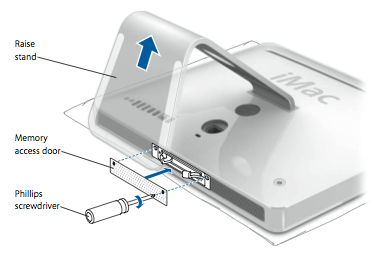
- Using a Philips screwdriver, remove the RAM access door in the bottom of your computer.
- Remove the access door and set it aside.
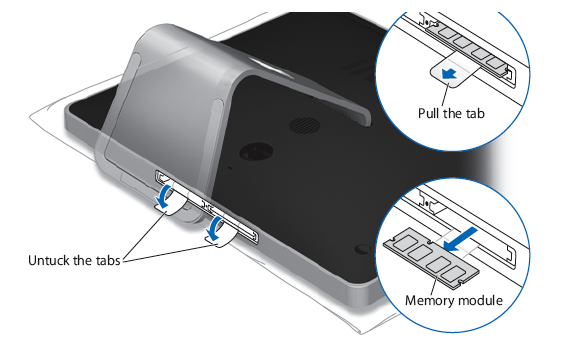
- Untuck the tab in the memory compartment. If you are replacing a
memory module, gently pull the tab to eject any installed memory
module.
- Insert your new or replacement SO-DIMM into the empty slot, noting the orientation of the keyway of the SO-DIMM as shown below.
- After you insert it, press the DIMM up into the slot. There should be a slight click when you seat the memory correctly.
- Tuck the tabs above the memory DIMMs, and reinstall the memory access door.
- Stand the computer in its upright position, reconnect the power cord and all other cables to the computer, then start up the computer.
Applicable models
iMac (24-inch, Early 2009)
iMac (20-inch, Early 2009)
iMac (24-inch, Early 2008)
iMac (20-inch, Early 2008)
iMac (24-inch Mid 2007)
iMac (20-inch, Mid 2007)
Memory specifications
These iMac computers have two side-by-side Synchronous Dynamic Random-Access Memory (SDRAM) slots in the bottom of the computer.
The maximum amount of random-access memory (RAM) you can install in the computer is:
| Computer | Memory Type | Maximum Memory |
| iMac (Mid 2007) | DDR2 | 4GB (2x2GB) |
| iMac (Early 2008) | DDR2 | 4GB (2x2GB) |
| iMac (Early 2009) | DDR3 | 8GB (2x4GB) |
You can use a 1GB or 2 GB RAM module in each slot for iMac (Mid 2007)
and iMac (Early 2008). Use 1GB, 2GB, or 4GB modules in each slot for the
iMac (Early 2009).
Use Small Outline Dual Inline Memory Modules (SO-DIMM) that meet all of these criteria:
| iMac (Mid 2007) | iMac (Early 2008) | iMac (Early 2009) |
| PC2-5300 | PC2-6400 | PC3-8500 |
| Unbuffered | Unbuffered | Unbuffered |
| Nonparity | Nonparity | Nonparity |
| 200-pin | 200-pin | 204-pin |
| 667MHz DDR2 SDRAM | 800MHz DDR2 SDRAM | 1066MHz DDR3 SDRAM |
DIMMs with any of the following features are not supported:
- Registers or buffers
- PLLs
- Error-correcting code (ECC)
- Parity
- Extended data out (EDO) RAM
Removing or installing memory
Warning: The internal components of your iMac computer can be warm. If you have been using your iMac computer, wait ten minutes after shutting down the computer to let the internal components cool before continuing.
To install memory into the bottom slot, follow these instructions:
- Turn off your computer by choosing the Apple () menu, then Shut Down.
- Disconnect all cables and the power cord from your computer.
- Place a soft, clean towel or cloth on the desk or surface to prevent scratching the LCD display.
- Hold the sides of the computer and slowly lay the computer face-down.
- Using a Philips screwdriver, remove the RAM access door in the bottom of the computer.
- Remove the access door and set it aside.
- Untuck the tab in the memory compartment. If you are replacing a
memory module, untuck the tab and pull it to eject any installed memory
module.
- Insert your new or replacement RAM SO-DIMM into the empty slot, noting the orientation of the keyway of the SO-DIMM as shown above.
- After you insert it, press the DIMM up into the slot. There should be a slight click when you seat the memory correctly.
- Tuck the tabs above the memory DIMMs, and reinstall the memory access door.
- Stand the computer in its upright position, reconnect the power cord and all other cables to the computer, then start the computer.
Applicable models
iMac (20-inch Late 2006)
iMac (17-inch, Late 2006 CD)
iMac (17-inch, Late 2006)
iMac (17-inch, Mid 2006)
iMac (20-inch, Early 2006)
iMac (17-inch, Early 2006)
Memory specifications
These iMac models have these memory specifications:
| Number of memory slots | 2 | ||
| Base memory | 1 GB | Two 512 MB DIMMs; one in each of the memory slots | iMac (Late 2006) |
| 512 MB | One DDR2 SDRAM installed into the top slot | iMac (17-inch Late 2006 CD) | |
| 512 MB | Two 256 MB DIMMs; one in each of the memory slots | iMac (Mid 2006) | |
| 512 MB | One DDR2 SDRAM installed into the top slot | iMac (Early 2006) | |
| Maximum memory | 4GB | 2 GB SO-DIMM in each of the two slots* | iMac (Late 2006) |
| 2 GB | 1 GB SO-DIMM in each of the two slots | iMac (17-inch Late 2006 CD) iMac (Early 2006) |
|
| Memory card specifications |
Compatible: - Small Outline Dual Inline Memory Module (DDR SO-DIMM) format - PC2-5300 - Nonparity - 200-pin - 667 MHz - DDR3 SDRAM |
Not compatible: - Registers or buffers - PLLs - ECC - Parity - EDO RAM |
|
| Additional notes | For best performance, fill both memory slots, installing an equal memory module in each slot. * The computer will only use a maximum of 3 GB of RAM. For more information, refer to iMac (Late 2006): Memory Specifications. |
||
Removing or installing memory
Warning: The internal components of your iMac computer can be warm. If you have been using your iMac computer, wait ten minutes after shutting down the computer to let the internal components cool before continuing.
Installing memory in the bottom slot
Important: When installing SDRAM DIMMs into the computer, press the DIMM up into the slot with your thumbs; do not use the DIMM ejector clips. Trying to push the DIMM into the slot using the ejector clips may damage the SDRAM DIMM.
To install memory into the bottom RAM slot, follow these instructions:
- Turn off your computer by choosing the Apple () menu, then Shut Down.
- Disconnect all cables and the power cord from your iMac.
- Place a soft, clean towel or cloth on the desk or surface to prevent scratching the LCD display. Hold the sides of the computer and gently lay the computer face down.
- Using a Phillips screwdriver, remove the RAM access door on the bottom of the iMac, as shown below.

- Remove the access door and set it aside.
- Move the DIMM ejector clips to their fully open position.
- Insert your RAM SO-DIMM into the bottom slot, keeping in mind the orientation of the keyed SO-DIMM as shown.
- After you insert it, press the DIMM up into the slot with your thumbs. Do not use the DIMM ejector clips to push in the DIMM. Trying to push the DIMM into the slot using the ejector clips may damage the SDRAM DIMM. There should be a slight click when you seat the memory fully.
- Close the ejector clips.
- Reinstall the memory access door.

- Lift the iMac back to its normal upright position and reconnect the power cord and all other cables. Your computer is ready to start up now.
Important: When installing SDRAM DIMMs into the computer, press the DIMM up into the slot with your thumbs; do not use the DIMM ejector clips. Trying to push the DIMM into the slot using the ejector clips may damage the SDRAM DIMM.
To replace memory into the top RAM slot:
- Turn off your computer by choosing the Apple () menu, then Shut Down.
- Disconnect all cables and the power cord from your iMac.
- Place a soft, clean towel or cloth on the desk or surface to prevent scratching the LCD display. Hold the sides of the computer and gently lay the computer face down.
- Using a Phillips screwdriver, remove the RAM access door on the bottom of the iMac, as shown below.
- Remove the access door and set it aside.
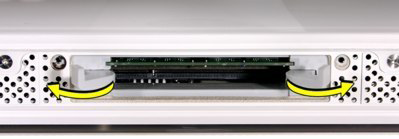
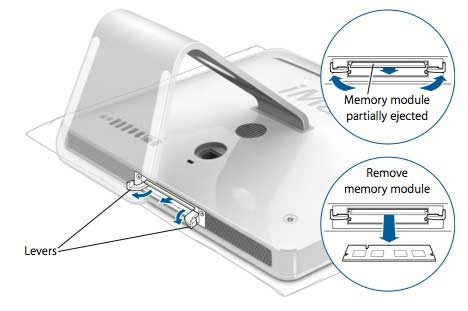
- Pull the two levers on each side of the memory compartment to eject the memory module that's already installed.

- Remove the memory module from your iMac as shown below.
- Insert your RAM SO-DIMM into the top slot, noting the orientation of the keyed SO-DIMM as shown below.

- After you insert it, press the DIMM up into the slot with your thumbs. Do not use the DIMM ejector clips to push in the DIMM. Trying to push the DIMM into the slot using the ejector clips may damage the SDRAM DIMM. There should be a slight click when you seat the memory fully.
- Cose the ejector clips as shown below.

- Reinstall the memory access door.
- Lift the iMac back to its normal upright position and reconnect the power cord and all other cables. Your computer is ready to start up now.
Additional Information
Checking that your computer recognizes the new memory
After installing additional memory, you should confirm that the computer recognizes the new memory. To check the computer’s memory:
- Start up your computer.
- When you see the Mac OS X desktop, choose Apple () from the upper-left menu bar, then choose About This Mac.
If your computer doesn’t recognize the memory or doesn’t start up correctly, confirm that the memory you installed is compatible with your iMac and that it is installed correctly by reseating the memory.
iMac: How to remove or install memory
Learn how to remove or install memory in your iMac computer.
Choose your model
To identify your iMac model, use the information in How to identify iMac models.
*Note: Memory replacement on the iMac (21.5-inch, Late 2012) and iMac (21.5-inch, Late 2013) is not user-removable and must be done by an Apple Retail Store or Apple Authorized Service Provider.
Applicable models
iMac (27-inch, Mid 2012)
iMac (27-inch, Mid 2013)
Memory specifications
These iMac models have these memory specifications:
| Number of memory slots | 4 |
| Base memory | 8 GB |
| Maximum memory | 32 GB Note: Memory replacement on the iMac (21.5-inch, Late 2012) and iMac (21.5-inch, Late 2013) is not user-removable and must be done by an Apple Retail Store or Apple Authorized Service Provider. |
Use Small Outline Dual Inline Memory Modules (SO-DIMM) that meet all of these criteria:
| iMac (Mid 2012) |
| PC3-12800 |
| Unbuffered |
| Nonparity |
| 204-pin |
| 1600MHz DDR3 SDRAM |
Removing or installing memory
Warning: The internal components of your iMac computer can be warm. If you have been using your iMac computer, wait ten minutes after shutting down the computer to let the internal components cool before continuing.
Installation
- Turn off your computer by choosing Shut Down from the Apple () menu.
- Disconnect the power cord and all other cables from your computer.
- Place a soft and clean towel or cloth on the desk or other flat surface to prevent scratching the display.
- Hold the sides of the computer and slowly lay the computer face-down on the towel or cloth.
- Open the memory compartment door by pressing the small grey button located just above the AC power port.
- The memory compartment door will open as the button is pushed in. Remove the compartment door and set it aside.
- Locate two levers on the right and left sides of the memory cage. Push the two memory cage levers outward to release the memory cage.
- Once the memory cage is released:, pull the memory cage levers toward you, allowing you to access each individual DIMM slot.
- Remove a DIMM by pulling the module straight up and out.
- Replace or install a DIMM by setting it down into the slot and pressing firmly until you feel the DIMM click into the slot.
Note: The DIMM slot shown below is for the the iMac (27-inch, Mid 2013) which requires you insert the DIMM with the notch on the bottom oriented towards the right. - Once you have all of your DIMMs installed, push the memory cage levers back into the housing until they subtly click back into place.
- Replace the memory compartment door. There is no need to depress the compartment door release button when replacing the compartment door.
- Place the computer in its upright position. Reconnect the power cord and all other cables to the computer, then start up the computer.
Note: There is a diagram on the underside of the compartment door showing the memory cage levers and the orientation of the DIMM.
Additional Information
See Mac computers: About startup tones if you hear tones after installing or replacing memory.
Applicable models
iMac (27-inch, Mid 2011)
iMac (21.5-inch, Mid 2011)
iMac (27-inch, Mid 2010)
iMac (21.5-inch, Mid 2010)
iMac (27-inch, Late 2009)
iMac (21.5-inch, Late 2009)
Memory specifications
These iMac models have these memory specifications:
| Number of memory slots | 4 |
| Base memory | 4 GB (but is configured to order) |
| Maximum memory | 16 GB Note: For the iMac (Late 2009) models, you can use 2 GB or 4 GB RAM SO-DIMMs of 1066 MHz DDR3 SDRAM in each slot. For the iMac (Mid 2010) and iMac (Mid 2011) models, use 2 GB or 4 GB RAM SO-DIMMs of 1333 MHz DDR3 SDRAM in each slot. |
Use Small Outline Dual Inline Memory Modules (SO-DIMM) that meet all of these criteria:
| iMac (Mid 2011) | iMac (Mid 2010) | iMac (Late 2009) |
| PC3-10600 | PC3-10600 | PC3-8500 |
| Unbuffered | Unbuffered | Unbuffered |
| Nonparity | Nonparity | Nonparity |
| 204-pin | 204-pin | 204-pin |
| 1333MHz DDR3 SDRAM | 1333MHz DDR3 SDRAM | 1066MHz DDR3 SDRAM |
Additional notes i5 and i7 Quad Core iMac computers come with both top memory slots populated. These computers will not start up if only a single DIMM is installed in any bottom slot; these computers should operate normally with a single DIMM installed in any top slot. Core Duo iMac computers should operate normally with a single DIMM installed in any slot, top or bottom. ("Top" and "bottom" slots refer to the orientation of the slots in the pictures below. "Top" refers to the slots closest to the display; "bottom" refers to the slots closest to the stand).
Removing or installing memory
Warning: The internal components of your iMac computer can be warm. If you have been using your iMac computer, wait ten minutes after shutting down the computer to let the internal components cool before continuing.
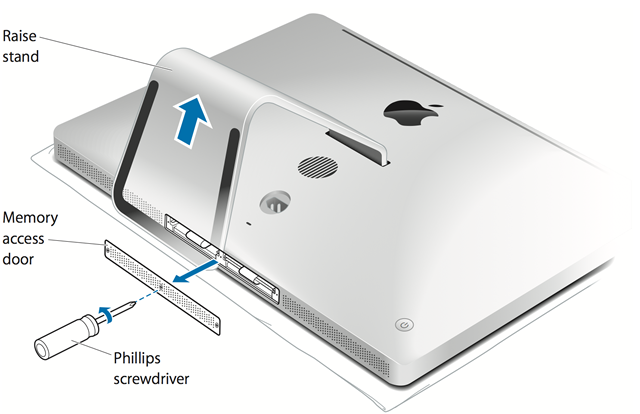
To install memory into the bottom slot, follow these instructions:
- Turn off your computer by choosing the Apple () menu, then Shut Down.
- Disconnect all cables and the power cord from your computer.
- Place a soft, clean towel or cloth on the desk or other flat surface to prevent scratching the LCD display.
- Hold the sides of the computer and slowly lay the computer face down.
- Using a Philips screwdriver, remove the RAM access door in the bottom of your computer.
- Remove the access door and set it aside.
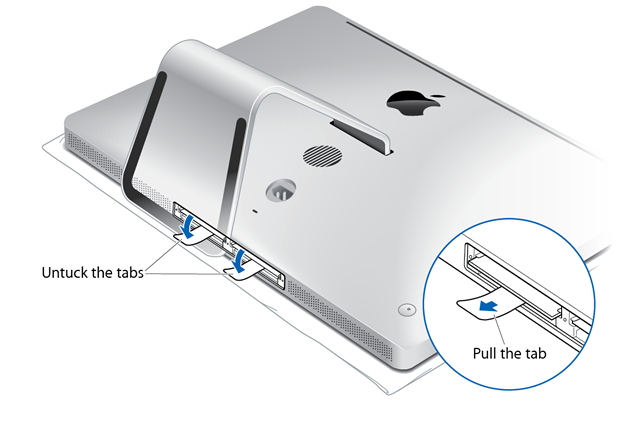
- Untuck the tab in the memory compartment. If you are replacing a
memory module, gently pull the tab to eject any installed memory
module.
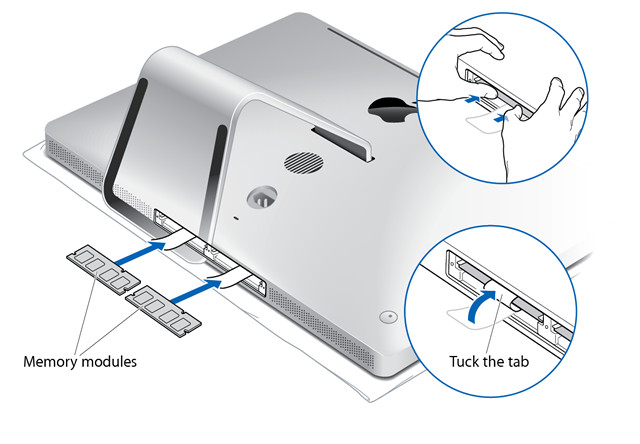
- Insert your new or replacement SO-DIMM into the empty slot, noting the orientation of the keyway of the SO-DIMM as shown below.
- After you insert it, press the DIMM up into the slot. There should be a slight click when you seat the memory correctly.
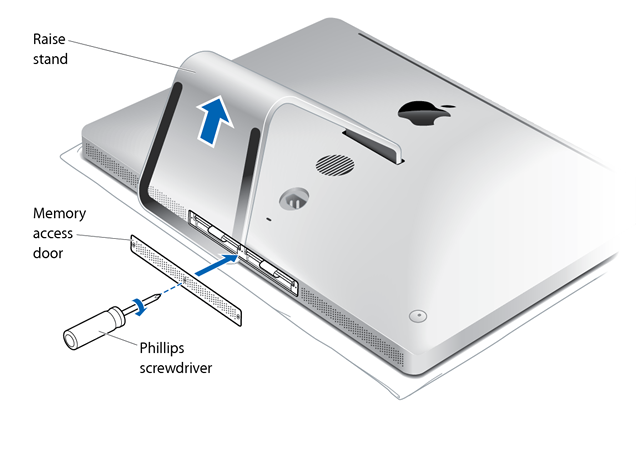
- Tuck the tabs above the memory DIMMs, and reinstall the memory access door.
- Stand the computer in its upright position, reconnect the power cord and all other cables to the computer, then start up the computer.
Applicable models
iMac (24-inch, Early 2009)
iMac (20-inch, Early 2009)
iMac (24-inch, Early 2008)
iMac (20-inch, Early 2008)
iMac (24-inch Mid 2007)
iMac (20-inch, Mid 2007)
Memory specifications
These iMac computers have two side-by-side Synchronous Dynamic Random-Access Memory (SDRAM) slots in the bottom of the computer.
The maximum amount of random-access memory (RAM) you can install in the computer is:
| Computer | Memory Type | Maximum Memory |
| iMac (Mid 2007) | DDR2 | 4GB (2x2GB) |
| iMac (Early 2008) | DDR2 | 4GB (2x2GB) |
| iMac (Early 2009) | DDR3 | 8GB (2x4GB) |
You can use a 1GB or 2 GB RAM module in each slot for iMac (Mid 2007)
and iMac (Early 2008). Use 1GB, 2GB, or 4GB modules in each slot for the
iMac (Early 2009).
Use Small Outline Dual Inline Memory Modules (SO-DIMM) that meet all of these criteria:
| iMac (Mid 2007) | iMac (Early 2008) | iMac (Early 2009) |
| PC2-5300 | PC2-6400 | PC3-8500 |
| Unbuffered | Unbuffered | Unbuffered |
| Nonparity | Nonparity | Nonparity |
| 200-pin | 200-pin | 204-pin |
| 667MHz DDR2 SDRAM | 800MHz DDR2 SDRAM | 1066MHz DDR3 SDRAM |
DIMMs with any of the following features are not supported:
- Registers or buffers
- PLLs
- Error-correcting code (ECC)
- Parity
- Extended data out (EDO) RAM
Removing or installing memory
Warning: The internal components of your iMac computer can be warm. If you have been using your iMac computer, wait ten minutes after shutting down the computer to let the internal components cool before continuing.
To install memory into the bottom slot, follow these instructions:
- Turn off your computer by choosing the Apple () menu, then Shut Down.
- Disconnect all cables and the power cord from your computer.
- Place a soft, clean towel or cloth on the desk or surface to prevent scratching the LCD display.
- Hold the sides of the computer and slowly lay the computer face-down.
- Using a Philips screwdriver, remove the RAM access door in the bottom of the computer.
- Remove the access door and set it aside.
- Untuck the tab in the memory compartment. If you are replacing a
memory module, untuck the tab and pull it to eject any installed memory
module.
- Insert your new or replacement RAM SO-DIMM into the empty slot, noting the orientation of the keyway of the SO-DIMM as shown above.
- After you insert it, press the DIMM up into the slot. There should be a slight click when you seat the memory correctly.
- Tuck the tabs above the memory DIMMs, and reinstall the memory access door.
- Stand the computer in its upright position, reconnect the power cord and all other cables to the computer, then start the computer.
Applicable models
iMac (20-inch Late 2006)
iMac (17-inch, Late 2006 CD)
iMac (17-inch, Late 2006)
iMac (17-inch, Mid 2006)
iMac (20-inch, Early 2006)
iMac (17-inch, Early 2006)
Memory specifications
These iMac models have these memory specifications:
| Number of memory slots | 2 | ||
| Base memory | 1 GB | Two 512 MB DIMMs; one in each of the memory slots | iMac (Late 2006) |
| 512 MB | One DDR2 SDRAM installed into the top slot | iMac (17-inch Late 2006 CD) | |
| 512 MB | Two 256 MB DIMMs; one in each of the memory slots | iMac (Mid 2006) | |
| 512 MB | One DDR2 SDRAM installed into the top slot | iMac (Early 2006) | |
| Maximum memory | 4GB | 2 GB SO-DIMM in each of the two slots* | iMac (Late 2006) |
| 2 GB | 1 GB SO-DIMM in each of the two slots | iMac (17-inch Late 2006 CD) iMac (Early 2006) |
|
| Memory card specifications |
Compatible: - Small Outline Dual Inline Memory Module (DDR SO-DIMM) format - PC2-5300 - Nonparity - 200-pin - 667 MHz - DDR3 SDRAM |
Not compatible: - Registers or buffers - PLLs - ECC - Parity - EDO RAM |
|
| Additional notes | For best performance, fill both memory slots, installing an equal memory module in each slot. * The computer will only use a maximum of 3 GB of RAM. For more information, refer to iMac (Late 2006): Memory Specifications. |
||
Removing or installing memory
Warning: The internal components of your iMac computer can be warm. If you have been using your iMac computer, wait ten minutes after shutting down the computer to let the internal components cool before continuing.
Installing memory in the bottom slot
Important: When installing SDRAM DIMMs into the computer, press the DIMM up into the slot with your thumbs; do not use the DIMM ejector clips. Trying to push the DIMM into the slot using the ejector clips may damage the SDRAM DIMM.
To install memory into the bottom RAM slot, follow these instructions:
- Turn off your computer by choosing the Apple () menu, then Shut Down.
- Disconnect all cables and the power cord from your iMac.
- Place a soft, clean towel or cloth on the desk or surface to prevent scratching the LCD display. Hold the sides of the computer and gently lay the computer face down.
- Using a Phillips screwdriver, remove the RAM access door on the bottom of the iMac, as shown below.
- Remove the access door and set it aside.
- Move the DIMM ejector clips to their fully open position.
- Insert your RAM SO-DIMM into the bottom slot, keeping in mind the orientation of the keyed SO-DIMM as shown.
- After you insert it, press the DIMM up into the slot with your thumbs. Do not use the DIMM ejector clips to push in the DIMM. Trying to push the DIMM into the slot using the ejector clips may damage the SDRAM DIMM. There should be a slight click when you seat the memory fully.
- Close the ejector clips.
- Reinstall the memory access door.
- Lift the iMac back to its normal upright position and reconnect the power cord and all other cables. Your computer is ready to start up now.
Important: When installing SDRAM DIMMs into the computer, press the DIMM up into the slot with your thumbs; do not use the DIMM ejector clips. Trying to push the DIMM into the slot using the ejector clips may damage the SDRAM DIMM.
To replace memory into the top RAM slot:
- Turn off your computer by choosing the Apple () menu, then Shut Down.
- Disconnect all cables and the power cord from your iMac.
- Place a soft, clean towel or cloth on the desk or surface to prevent scratching the LCD display. Hold the sides of the computer and gently lay the computer face down.
- Using a Phillips screwdriver, remove the RAM access door on the bottom of the iMac, as shown below.
- Remove the access door and set it aside.
- Pull the two levers on each side of the memory compartment to eject the memory module that's already installed.
- Remove the memory module from your iMac as shown below.
- Insert your RAM SO-DIMM into the top slot, noting the orientation of the keyed SO-DIMM as shown below.
- After you insert it, press the DIMM up into the slot with your thumbs. Do not use the DIMM ejector clips to push in the DIMM. Trying to push the DIMM into the slot using the ejector clips may damage the SDRAM DIMM. There should be a slight click when you seat the memory fully.
- Cose the ejector clips as shown below.
- Reinstall the memory access door.
- Lift the iMac back to its normal upright position and reconnect the power cord and all other cables. Your computer is ready to start up now.
Additional Information
Checking that your computer recognizes the new memory
After installing additional memory, you should confirm that the computer recognizes the new memory. To check the computer’s memory:
- Start up your computer.
- When you see the Mac OS X desktop, choose Apple () from the upper-left menu bar, then choose About This Mac.
If your computer doesn’t recognize the memory or doesn’t start up correctly, confirm that the memory you installed is compatible with your iMac and that it is installed correctly by reseating the memory.