Mac mini: How to remove or install memory
Mac mini: How to remove or install memory
Learn how to remove or install memory into your Mac mini computer.
Choose your model
To help determine which Mac mini you have, use the information in How to identify Mac mini models.
| 2012 |
Mac mini (Late 2012) |
| 2011 |
Mac mini (Mid 2011) |
| 2010 |
Mac mini (Mid 2010) |
| 2009 |
Mac mini (Late 2009) Mac mini (Early 2009) |
| 2007 | Mac mini (Mid 2007) |
| 2006 |
Mac mini (Late 2006) Mac mini (Early 2006) |
Important: To minimize the possibility of damage to the computer components due to static discharge, wear an antistatic wrist strap while you work inside the computer.
Applicable model
Mac mini (Late 2012)
Mac mini (Mid 2011)
Mac mini (Mid 2010)
Memory specifications
This Mac mini has these memory specifications:
| Number of memory slots | 2 |
| Maximum memory |
|
| Memory card specifications | |
| Additional notes |
For best performance, don't mix sizes of memory modules. Install two identical memory modules.
|
Removing or installing memory
Warning: Always shut down your Mac mini and remove the power cord before installing memory. Do not install memory while your Mac mini is plugged in.
Step 1: Remove the bottom cover
- Turn off your Mac mini. From the Apple menu (), choose Shut Down.
- Disconnect all cables. Disconnect the power cord and all other cables from your Mac mini.
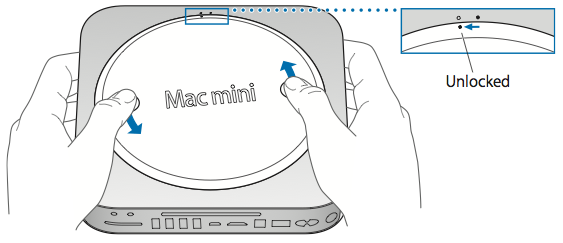
- Lay your Mac mini upside down on a soft cloth or towel, and then
rotate the bottom cover counterclockwise to the unlocked position.
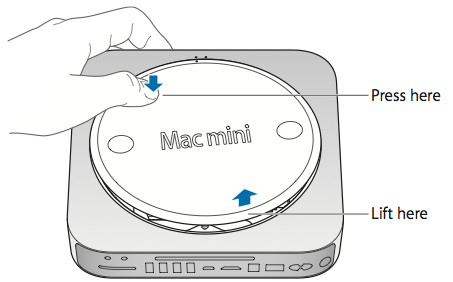
- Press on the cover to pop up the opposite side, and then remove the cover.
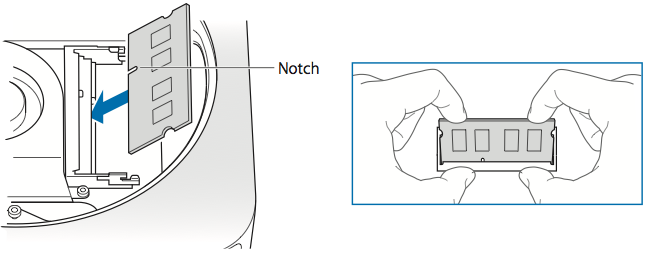
- Gently spread the clips at the ends of the top memory module just enough to let the free edge pop up.
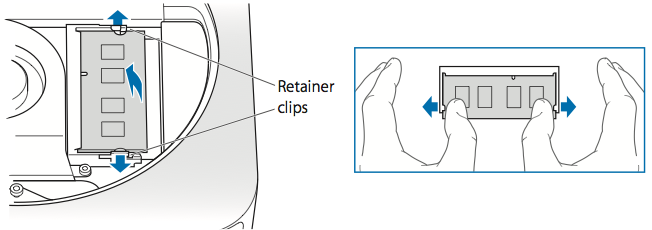
- Pull the module out of the slot.
- Repeat to remove the second, bottom module.
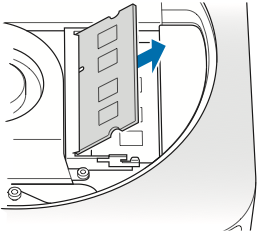
- Carefully press the notched edge of the new memory module into the bottom slot while keeping the opposite edge slightly raised.
- Press down on the raised edge until the clips snap into place.
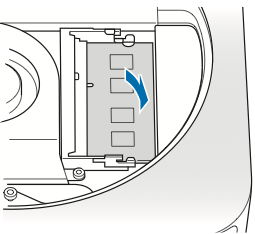
- Repeat to install the top memory module.
Warning: Don't connect the power cord or turn on your Mac mini until you replace the bottom cover. Never operate your Mac mini without the cover in place.
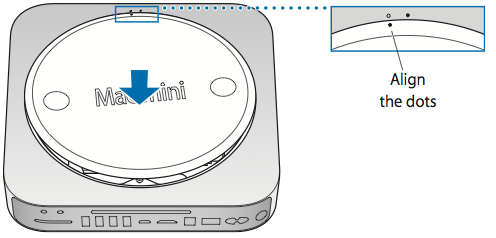
- Replace the bottom cover using the alignment dots to place it in the unlocked position.
- Rotate the cover clockwise to lock it in place.
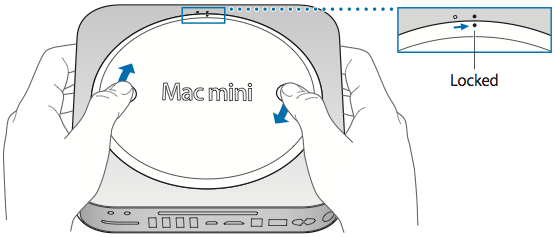
- Reconnect the power cord and any other cables you disconnected.
Applicable models
Mac mini (Late 2009)
Mac mini (Early 2009)
Memory specifications
These Mac mini models have these memory specifications:
| Number of memory slots | 2 | |
| Base memory | Configure to order (CTO) to its maximum SDRAM configuration | |
| Maximum memory | 4 GB | |
| Memory card specifications |
Compatible: - Small Outline Dual Inline Memory Module (SO-DIMM) format - 1066 MHz PC3-8500, DDR3 - Unbuffered - Non-parity - 204-pin |
Not compatible: - Registers or buffers - PLLs - ECC - Parity - EDO RAM |
| Additional notes | For best performance, don't mix sizes; always install two identical memory modules (a pair of 1 GB or 2 GB memory modules). | |
Removing or installing memory
Important: You should not manually upgrade or replace the memory in these Mac mini models. Instead, contact an Apple Authorized Service Provider to install memory for you.
Applicable models
Mac mini (Mid 2007)
Mac mini (Late 2006)
Mac mini (Early 2006)
Memory specifications
These Mac mini models have these memory specifications:
| Number of memory slots | 2 | |
| Base memory | Configure to order; at least 512 MB or DDR2 SDRAM (one 256 MB SO-DIMM in each slot) | |
| Maximum memory | 2 GB | |
| Memory card specifications |
Compatible: - Small Outline Dual Inline Memory Module (SO-DIMM) format - 667 MHz, PC2-5300, DDR2 compliant - Unbuffered - Nonparity - 200-pin |
Not compatible: - Registers or buffers - PLLs - ECC - Parity - EDO RAM |
| Additional notes | For best performance, use two SO-DIMMs (one in each slot) of the same DIMM size (example: two 512 MB SO-DIMMs). | |
Removing or installing memory
You should not manually upgrade or replace the memory in these Mac mini models. Instead, contact an Apple Authorized Service Provider to install memory for you.
Additional Information
Checking that your computer recognizes the new memory
To check that the computer recognizes the new memory:
- Start up your computer.
- When you see the Mac OS X desktop, choose Apple () from the upper-left menu bar, then choose About This Mac.
If the reported memory size isn't correct or if your Mac mini repeatedly plays three tones, it may be having trouble recognizing a memory module. If this happens, shut down your Mac mini, verify the module specifications against the requirements listed above, and then repeat the memory installation instructions to make sure the modules are installed correctly. If you still have issues, remove the memory and consult the support information that came with the memory, or contact the vendor who provided the memory.